Tutorial!-
You will need:
Colored pants
Various types of trim
Sharpie
Fabric glue
Pins
Needle
Ssissors
Color coordinating thread
Sewing machine (VERY helpful but not necessary)
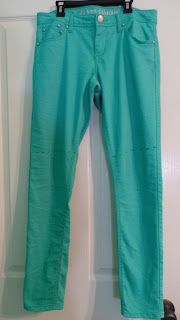
A few days ago I snagged these fine colored skinny jeans from Goodwill, and I decided they had great potential as shorts.
Decide what length you want your finished shorts to be, and then add between 3 and 5 inches for the rolled section. Measure the inseam (mine was 10 inches total), mark the jeans all the way across, pin the waitsband together, and cut off the excess leg.
I think it's best to pin the waistband together because (at least on my pants) the front wanted to sag down in front of the back and I wanted my cut to be nice and straight so I took the extra 45 seconds and pinned it.
I cut through the front and the back at the same time because I figured that would ensure an even cut all the way around.The image below shows the basic cut off shorts without decor.
Now we need to mark the very bottom of the shorts, inside the fold where our trim will be sewed on. I simply flapped the roll open and made a small mark with my sharpie (while standing).
Now it's trim time! I chose to go with rick rack, but you can choose whatever strickes your fancy. Pin it (if that helps you) and sew! I ran into some issues towards the bottom of the side pocket. My pants had a little decorative doodad and I had to raise the foot and continue sewing. You've been warned.
Now to keep the end of the rick rack from fraying you can either use a dab of E6000 or do a quick horizontal stitch.
Sidenote: Not going to lie, my sewing of the rick rack was not stellar. It was kinda my first time sewing on rick rack and I made some mistakes, but I don't think it's really that big of a deal. Not worth ripping out, anyway. So what if it's not fully centered? Nobody is going to inspect it.
Now it's butt pocket time! I chose to use a nice lacy/loopy trim. I also chose to hand sew it on.
I chose to double layer the trim on the pockets, but of course, this is all up to you.
Here's what the inside looks like, if you need some reference about how closely to sew your trim. You can see the first and second layer pretty clearly.
Ta-Da!
Don't these look oh so Mariarchi-esque? As soon as I made this realization 50 Ways to Say Goodbye played on Spotify. Yes.
But somehow these magical shorts also look very Antropologie-esque, yes? See, these shorts are the embodiment of intense.
Also, as I sit here and blog I'd like to point out how my dog is the cutest ever.


Gracie slept intensely thru the whole amazingly intense demo, I bet! Great job and demo Chloe.....I loved it!!!! (And I'm sure Gracie did too, but way too intensely sleepy to bark her praise!!) Love you!!
ReplyDeleteOh Aunt Linda, I love you too!
Delete